Reduce, Reuse, Recycle, and Tag Us #IGTupcycle
Each In Good Taste wine flight features six to eight mini bottles of premium wine, presenting the perfect opportunity to taste your way through the best that the world of wine has to offer. We’ve put our fans on social media to the test to provide their favorite upcycle ideas for reusing each 187ml bottle after their tasting is over. Let’s take a look at some of the most creative wine bottle upcycled DIY projects!

First Things First: Removing the Labels!
If you are like most people, you don’t want the wine bottle label stuck on the glass when repurposing it. However, it is a mistake to attempt to peel off the label with your fingernails as doing so will chew up your precious time and prove quite frustrating. Instead, take note of the following helpful tips to remove labels from your wine bottles prior to repurposing them, for additional utility or decorative beauty.
Option 1) Dry Heat
One of the best ways to remove labels from wine bottles is to hold a hairdryer over the bottle label, running it on high for a couple of minutes. The heat from the hairdryer will soften the adhesive and might even help its corners curl upward away from the glass for easier removal.
Option 2) Wet Heat
Another effective way to remove the labels from your used small wine bottles is with the use of hot water. Soak your wine bottles in a dish basin full of hot, soapy water for several hours or even overnight. The hot water will loosen up the label, making it that much easier to peel it off with your fingernail or a butter knife.
Option 3) Solvents & Oils
If you’re unable to remove all paper and adhesive from the bottle using either heat method, following up with Goo Gone or even good, old, creamy peanut butter may help! The oil from peanut butter breaks down and weakens the adhesive, and is surprisingly simple to clean up. Spray Goo Gone or spread PB liberally on your wine bottles, let sit for 10-15 minutes, then wipe away.
Clean, sanitize and dry your bottles fully before using them for food or drink preparation.
DIY Wine Bottle Tiki Torch
Wouldn’t it be nice if you could repurpose your wine bottles into tiki torches? Flex your creative muscle and you will be able to do exactly that, turning wine glass bottles that would have otherwise been recycled into artful tiki torches that illuminate the area around your home. Here is a quick look at how to make your own wine bottle tiki torch.

DIY Wine Bottle Tiki Torch
- Materials:
- Instructions:
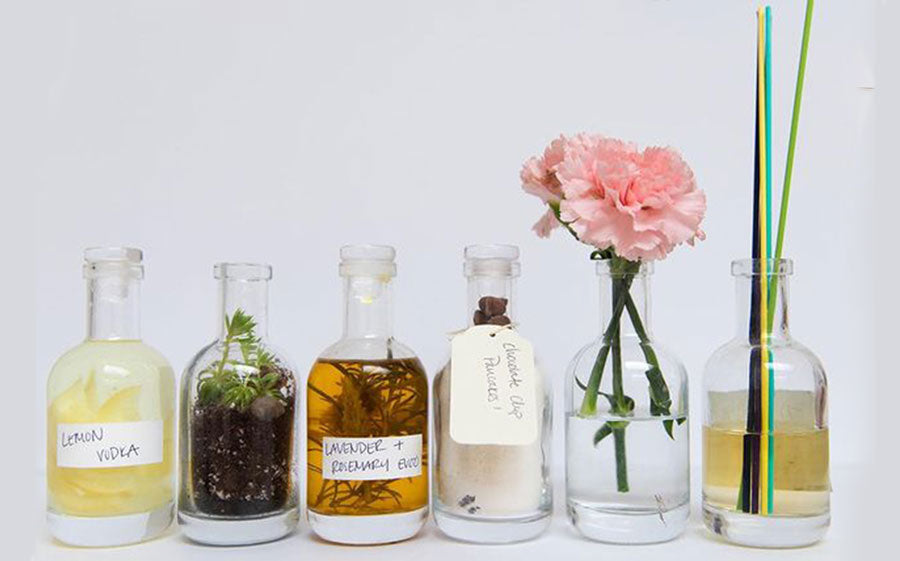
DIY Wine Bottle Fruit-infused Water
Once you've enjoyed the last drop of your fruit-forward wine, our 187ml glass bottles also work great for fantastic, single-serving water infusions! is Fruit-infused water sipped from a wine bottle tastes refreshing and sweet, yet has significantly less sugar and calories than eating those fruits in solid form. This is the quickest and best way to clench your thirst without resorting to plain water that lacks flavor. An added bonus is the beauty of a water-filled wine bottle that doubles as décor in your fridge or table.

DIY Wine Bottle Fruit-Infused Water
- Some great fruits and vegetables to use in infused water include:
- Berries like Strawberries, Blueberries, or Blackberries
- Citruses like Lemons, Limes, or Grapefruit
- Other fruits like Melons
- Vegetables like Carrots, Cucumbers, or Fennel
- Herbs and Spices
- Edible Flowers like Violets
- Have fun and create delicious combinations like:
- Strawberry, Basil, and Lemon
- Honeydew Melon, Cucumber, and Mint
- Blackberries, Orange, and Ginger
- Blueberry, Lemon, and Rosemary
- Pineapple, Coconut, and Lime
- Mango, Raspberry, and Ginger
- Grapefruit and Jalapeno
- Raspberry and Rosemary
- Instructions:
- 1. To begin, wash all the herbs, fruits, and vegetables you want to add to your water-filled wine bottles. To avoid extra bitterness, peel all citrus and cucumbers before use.
- 2. Next, chop your fruits or vegetables small enough to fit into the mouth of the bottle. Pre-chopping will also provide more surface area to inject even more flavor into the water than whole fruits. Fill the bottle ½-¾ full with fruit and top with filtered water.
- 3. Allow this mixture to steep for at least 15 minutes. You can continue to add more water to the fruit-laden wine bottle as you drink it to maintain the amazing fruit flavor. Longer steeping times will deepen the flavor.
Enjoy your fruit-infused water within eight hours for optimal flavor, and to avoid spoiling. For a longer shelf-life, straining the pieces of fruit and retain the flavorful water within a covered bottle or thermos. Keep this fruit-infused water in the refrigerator for up to 2 days.
For even more flavor, steep your bottles in a warm area with sunlight for an hour or less. Similar to sun tea, the sunlight extracts the flavors all the more prior to moving the bottle to the fridge. Once your fruit-infused water is ready to drink, filter it with cheesecloth layers or even a sieve to eliminate the pulp and seeds prior to sitting back, relaxing, and sipping away.
Alternatively, switch it up by flavoring ice cubes, to chill and flavor your water as it melts. Add fresh pieces of chopped fruit to ice cube molds, top with water, and freeze until solid. Once the ice cubes are ready, drop them into your partially filled wine bottles so the water tastes cooler and has that much more fruit infusion. Or try these recipes with sparkling water!
DIY Wine Bottle Plant Propagation
Many of us picked up hobbies during quarantine; from baking, to puzzles, Netflix-officianados. If you've chosen the path of "plant-aholic," our beautiful bottles also make great propagation stations, or nurseries for sprouts to grow their widdle roots.

DIY Wine Bottle Plant Propagation
- Materials:
- Scissors or garden shears
- Clean IGT Mini Bottle
- A plant that can be reproduced using propagation, such as pathos ivy, philodendrons, Christmas cactus, monsteras, ZZ plants, or even mint
- Instructions:
- 1. Use scissors or garden shears to cut a small section of the stem (at least 3" long) just below its joint. For ivy, this will look like a gray knob on the vine, for others it may be where the plant has roots showing, or a knuckle of the branch.
- 2. Dip your plant in root stimulator or even ground cinnamon, and place the cut end into the bottle.
- 3. Add water so that cut end of stem is 1-inch below water's surface and place in a sunny area.
DIY Wine Bottle Infused Oils
There’s no sense in paying through the nose for savory-infused oil when you can make your own at home with your empty wine bottles. A freshly cleaned used wine bottle is perfect for all different types of oil, herbs, and spices. From pure olive oil to canola oil, safflower oil, and beyond, you can make all sorts of different savory-infused oils on your own in the comfort of your home.
Resist the temptation to use the super expensive extra virgin olive oil as you will add flavoring that offsets the olive scent and flavor. Furthermore, canola oil and grapeseed oil are worth considering, especially if you want to infuse stronger flavors such as mint or ginger. Regular olive oil is optimal for oregano and rosemary.

DIY Wine Bottle Infused Oils
- Best herbs and spices for making flavorful oils:
- Chamomile Flower
- Lavender Flower
- Comfrey Leaf
- Chili Flakes
- Lemon Balm
- Thyme
- Peppermint Leaf
- Instructions:
- 1. Add herbs to the empty bottle, leaving a couple of inches of room above for oil.
- 2. Fill the bottle with oil, covering the herbs by at least an inch. When in doubt, err on the side of adding more oil rather than less.
- 3. Replace the bottle top, shake and place in a sunny window. Continue to shake the bottle once per day.
- 4. After a couple of weeks pass, strain the herbs from the oil with a mesh strainer or cheesecloth and store the savory-infused oils in a dark and cool area. Depending on the oil used, your infusion should be useful for 2-12 months.
In general, it is best to use dry herbs. However, if you choose fresh herbs, bruise or crumple them and give them some time to wilt so excess moisture can be eliminated. Cut the wilted herbs into small pieces and crush them prior to adding them to the empty small wine bottles.
Steeping oils in the sun will also help to naturally infuse flavors into the oil. Rely on the sun to enhance the infusion process and the resulting herbal oil will prove useful for both culinary oils as well as body care. For an oil hair mask that hydrates, use your empty small wine bottles to make rosemary-infused olive oil.
DIY Cocktail Mixers
Upcycle your wine bottles into cocktail mixers, invite some friends over and you are sure to have a blast. Most cocktail mixers are a basic blend of simple syrup and flavoring.

Flavored Simple Syrup Recipe for Cocktail Mixers
- Ingredients:
- ½ cup Water
- ½ cup Sugar
- ¼ cup Herb of Your Choice
- Instructions:
- 1. In a small saucepan, bring water and sugar to a boil.
- 2. Remove from the heat and add flavorings, and steep for at least 2 hours at room temperature.
- 3. Strain, pour into a clean IGT Mini Bottle, cover tightly, and refrigerate.
Flavored Liquor Recipe for Cocktail Mixers
- Ingredients:
- 6 ounces Vodka or Rum
- ¾ tsp Dried Herb of Your Choice
- Instructions:
- 1. In a clean IGT Mini Bottle, combine vodka and dried herbs.
- 2. Cover tightly and store at room temperature for one week.
- 3. Strain and store in a refrigerator for up to one month.
Cocktail mixer recipes will vary, so follow the instructions for making and storing.
Share Your DIY Wine Bottle Upcycling Ideas!
Do you have any other ideas for wine bottle upcycling? We would love to share them with our community! We welcome all creative ideas. Tag us @ingoodtastewines or #IGTupcycle with your wine bottle upcycling ideas.


